Changing the Custom Domain connected with your Vacation Labs account
This guide will walk you through the process of updating the custom domain connected to your Vacation Labs website.
Before you begin: Ensure your new domain is properly registered and its DNS settings are configured to point to Vacation Labs. You may need to update these records with your domain registrar.
Steps to Update Your Custom Domain
-
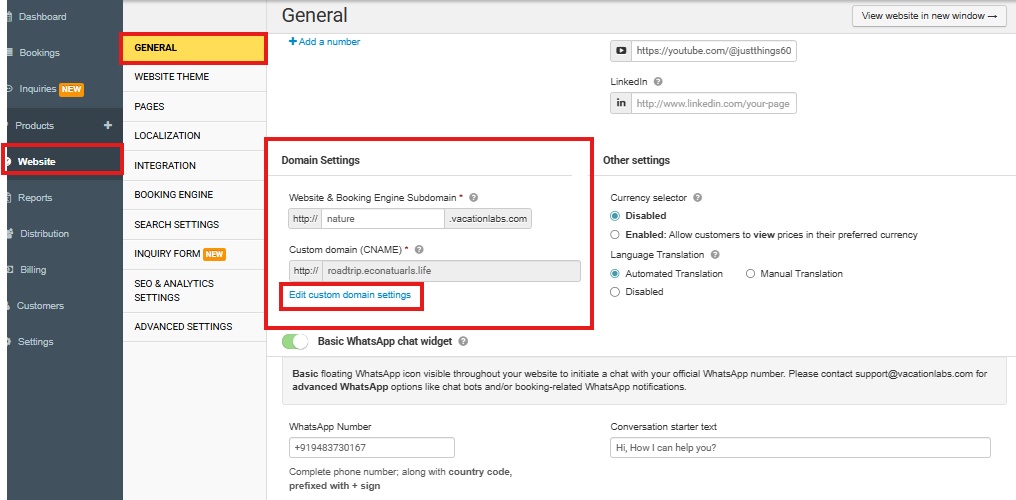
Access Your Website Settings
-
From your Vacation Labs dashboard, navigate to the main menu on the left-hand side.
-
Click on the section labeled WEBSITE.
-
Within the WEBSITE sub-menu, select GENERAL. This will open your site’s general configuration settings.
-
-
Locate the Domain Settings Section
-
On the GENERAL settings page, scroll down until you find the panel titled DOMAIN SETTINGS.
-
In this section, you will see your current domain configuration. To make changes, click the button that says ‘EDIT CUSTOM DOMAIN SETTINGS’.
-
-
Modify Your Domain
-
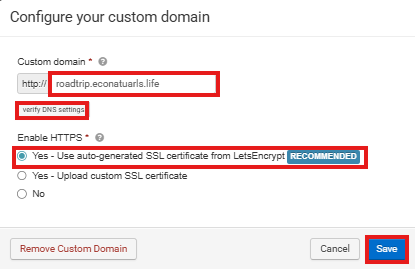
Clicking the edit button will open a dialog box (pop-up window).
-
In this window, you will see a field displaying your currently connected custom domain.
-
Select and remove the old domain address from this field.
-
Carefully type your new full custom domain into the now-empty field (e.g., www.yournewdomain.com ).
-
Click on Verify dns Settings Once it is verified then only you can add the SSL cert and save it
-
Select the SSL Certificate Yes - Use auto-generated SSL certificate from LetsEncrypt
-
-
Save Your Changes
-
It is crucial to finalize the action. Before closing the pop-up, click the SAVE button to confirm and apply the new domain settings to your account.
-
The system may take a short time to propagate the change across the internet.
-
Note: After changing your domain, visitors may be temporarily redirected to the old site until DNS caches refresh globally, which can take up to 48 hours.